
Guide to Migrate Your Website
Step-by-Step Guide to Migrate Your WordPress Site to a New Host
Transferring your website to a new host can be stressful, but it doesn’t need to be. Many users are planning to transfer their website to a more powerful and reliable hosting company with 24/7 customer support and 99.9% uptime. The website owner will either pay an experienced or professional server administrator to transfer their site or find a hosting company that offers services as a hosting package or move it by themselves.
If you spend a little time preparing your website, migrating a website is not difficult. It can be very straightforward if approached systematically and can easily be reversed should any issue arises.
Let’s run through the steps required to move your WordPress website to a new host, but before we get started showing you how you can migrate your site, please keep in mind that many quality WordPress hosting companies will move your site for you, so if you have just purchased a new hosting plan and are looking to move your site check with your new hosting provider first to see if they offer free migration.
Step 1: Back up your website files
The very first step of any project such as this is to back up every aspect of your site. This step is good practice before any major change but it is also a requirement of migrating your WordPress installation.
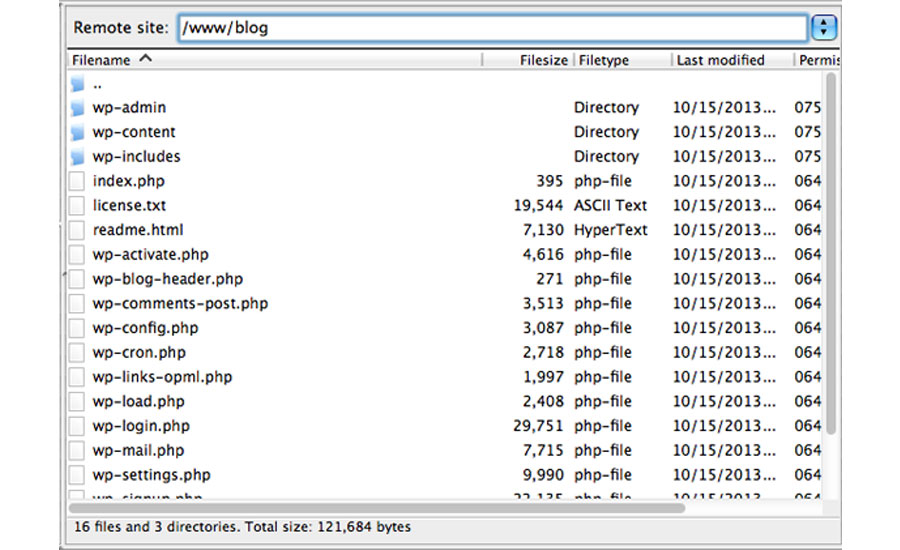
There are many plugins out there that will completely backup your site for you. This backup, however, requires a more manual approach. Using an FTP program (such as FileZilla), connect to your web host and copy all files under your website’s directory to a folder on your local computer.
This includes the .htaccess file that is set to be hidden. Consult your FTP program’s help file to have it display hidden files if you are unable to see this file.
Depending on the number of media uploads you have on your site, this could take some time. While this download is underway we can begin step two and make a copy of your database.
Step 2: Export The WordPress Database
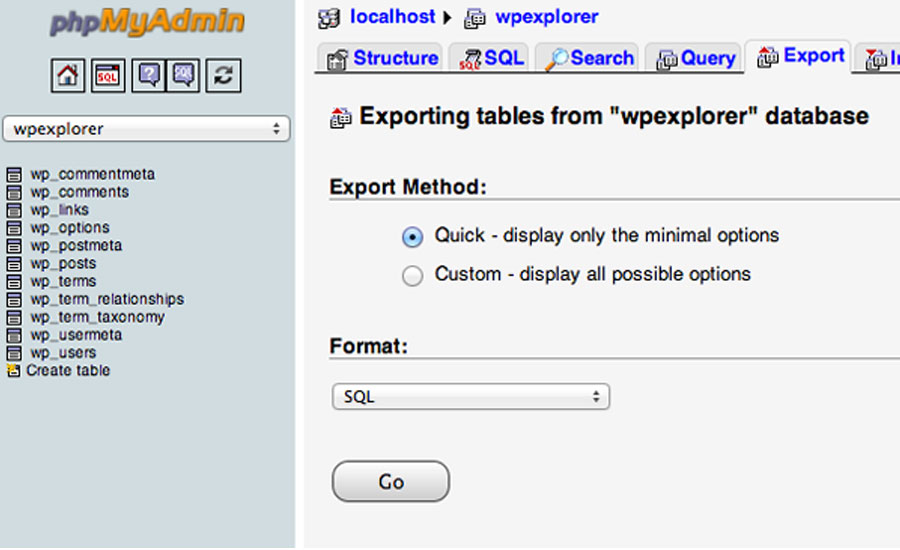
Exporting your database is a simple process that only requires a few steps to complete. Login to the cPanel account of your web server and open the phpMyAdmin application. Select the database that contains your WordPress installation from the list on the left-hand sidebar and once selected click on the Export tab on the navigation menu.
The default settings of a Quick export and the SQL format for the export are sufficient for what we need. Click the Go button and the database export process will begin and a file will be downloaded to your local computer.
Once the database export and the FTP transfer of your files have both completed, you are ready to move onto the next stage.
Step 3: Create The WordPress Database On Your New Host Server
Before we can begin the migration to the new web host, we need to create an environment for a WordPress installation. To do this you must create a database that you can import your SQL data into.
Login to your new web host with the user credentials they have supplied you and connect to the cPanel software. For our guide, we will be using the MySQL Databases application. If your web host doesn’t have that application running then you will contact their support team to discover their method of creating new databases.
The steps to create a database are quite simple:
- Open MySQL Database and create a new database with an appropriate name for your website.
- Create a new MySQL user (with a secure password).
- Add this user account to the new database and grant it All Privileges.
Write down the database name, the new MySQL username, and its password. You will need them soon.
Step 4: Edit the wp-config.php File
Browse to the folder on your local computer where you downloaded your website files to. In that folder, there is a file called wp-config.php that controls the access between WordPress and your database.
Make a copy of this file and store it in another folder on your local computer. This is necessary for restoring the changes we are about to make should something go wrong later.
Open the original version of the file with your favorite text editor and make the following three changes:
1. Change The Database Name
Locate the following line:
define(‘DB_NAME’, ‘db_name’);
The db_name portion of this line will currently be set to the MySQL database name of your old web host. This must be changed to the name of the new database you have just created.
2. Change the Database Username
Below this you will find the line:
define(‘DB_USER’, ‘db_user’);
In this line, you need to change the db_user portion from the username of your old host to match the new username you have just created.
3. Change The Database User Password
Finally, edit the third line:
define(‘DB_PASSWORD’, ‘db_pass’);
As with the others, the db_pass section of this line must be changed to the new secure password you created for your MySQL user.
Save wp-config.php and close the file.
Step 5: Import Your Database
Now that you have a new database to work with we can begin the import process.
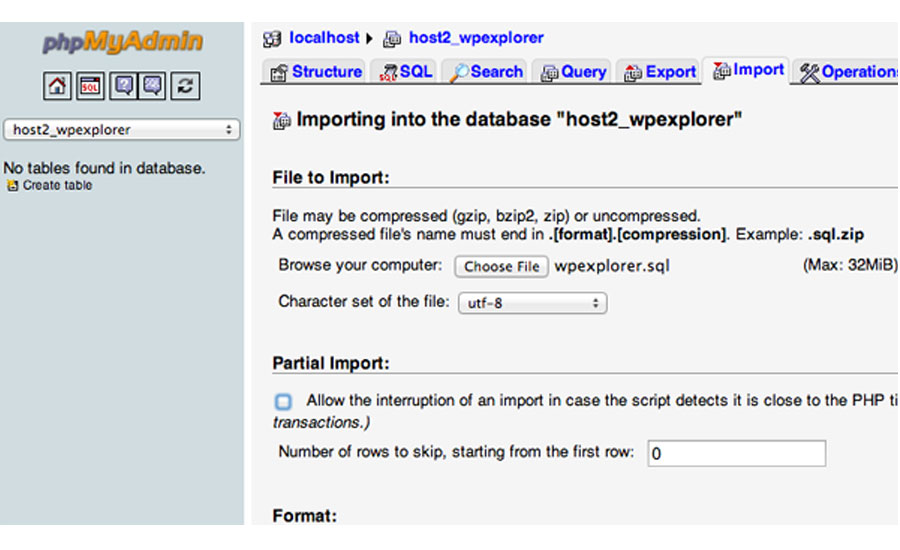
Launch phpMyAdmin from the cPanel software on your new server and select your new database from the list on the left hands sidebar. Once it opens select the Import tab from the navigation menu.
In the File to Import section click the Choose File button and select the SQL file you exported previously.
Un-tick the Partial Import checkbox, make sure the format is set to SQL and then click the Go button. The database import will now begin.
The time this import takes varies depending on the size of your database. You should receive a message informing you of the success of the import when it has finished.
Step 6: Upload The WordPress Files To Your New Host
Now that you have the new database prepared and you’ve reconfigured the wp-config.php file, it is time to begin uploading your website’s files.
Connect to your new web host using your FTP program and browse to the folder that your website is going to be held. If this is the primary, or only site being installed on this webserver then uploading the files to the public_html folder is the usual directory.
With the remote directory selected you can upload your website files that should now include the updated version of wp-config.php. As with the earlier download, this process can take some time.
Don’t delete these files from your local computer once the upload finishes. They are still needed until the final steps have been completed.
Step 7: Defining New Domain & Search/Replace Old Domain
If you are moving to a new/different domain then you should read over this step, if not, then you can skip this because you don’t have to update your site to point to a different domain.
One issue people always seem to have when moving their site is that they’ve added links to other posts on their site or inserted images directly by pointing to a URL on the server, causing these to break when moved over to a new domain. If you want to quickly and easily search for any instances of your old domain name and replace it with the new name we suggest you take a look at the Search Replace DB script on Github. This will allow you to do this with great ease. Just make sure you DELETE it when you are done (for security reasons) and don’t place it in your root domain, create a temp folder with a random name to host the script.
Changing Site URL: By searching and replace for the old domain and replacing with the new domain you’ll also be altering the site_url and home URL values in the database (Changing the Site URL) which will ensure that when you try to log into your site on the new domain it doesn’t try and redirect you over to the old domain.
Step 8: The Final Touches
This step includes two separate things with (potentially) several days between them.
Before you can use the site on your new host you will need to reconfigure your domain’s DNS settings. They will be set to point to your old host and you will need to point the correct records to the new server IP address.
This process will depend on where you have your domain registered. The details of completing this process are too varied to discuss in this post, but your domain registrar should have all of the details you need to make this change.
DNS changes can take up to 48 hours to fully propagate. It’s best to do this at a period when you expect lower levels of traffic. During this 48 hour window, you should avoid making any changes to your website as you may be changing the old version of the site.
After the 48 hours have expired you should now be accessing the new web host when you go to your website. It’s at this point you can connect to your old web host to delete the files and database. You should still have a local backup copy of these files and the database export, along with the original wp-config.php file in case you need to roll back the migration. It can be a good idea to hold onto these files for an extended period just to be on the safe side.
Conclusion
As you can see, when broken down into the above simple steps, the process isn’t that difficult. All it requires is for you to be careful at each step and give yourself the option to go back to the original version until the last possible moment (in case of any problems).
Have you migrated your WordPress website recently? Let us know your experience with the process in the comments section below!